Kitting Operations
Last updated: March 4, 2026
Diataxis Type: How-to Guide
Audience: Arda users managing kit assembly and pre-staging
Collection: Help Center / How-to Guides
Purpose
This guide covers how to manage kitting operations using Arda order cards and inventory shelving. It walks through setting up kit components, assembling kits from stock, handling stockouts when they happen, and keeping kit components from drifting out of sync.
What Is a Kit in Arda?
A kit is a group of components that are consumed together. Three common patterns:
PatternDescriptionExample | ||
Assembly kit (internal) | Components pulled from inventory shelves and grouped for an internal job or work order | Hardware kit: 4 screws, 2 gaskets, 1 housing, 1 filter |
Assembly kit (customer product) | Components bundled into a single product sold to customers. Each sale consumes one of every component. | Engine swap control pack: PCM, wiring harness, throttle pedal, MAF sensor, air box, radiator hoses, HEGO sensors |
Pre-staged kit | Components grouped ahead of a work order so a tech has everything ready at the bench | Service kit for PM Job #1247 |
Customer product kits are especially sensitive to stockouts. If one component is missing, you can't ship the product. A control pack missing its MAF sensor is not a control pack.
All three patterns use the same Arda workflow: pull from the shelves, check against a kit list, and let the Kanban system handle reordering.
Why Stock Disappears
Before setting up reorder points or calculating buffers, you need to understand the two reasons stock leaves the shelf. Every formula in this guide accounts for both.
Planned Consumption
Someone pulls parts for a kit. This is the normal flow. The Kanban system sees it -- when the shelf hits the reorder point, the order card gets scanned and the replenishment signal fires. The system works as designed.
Unplanned Loss
Stock also disappears without triggering a Kanban signal:
Defects: A part arrives damaged or fails inspection after it's already been shelved. The shelf count drops but no order card was scanned.
Shrinkage: Parts walk off -- grabbed for a one-off job, borrowed by another department, lost in transit between receiving and the shelf.
Misplaced items: A part gets restocked in the wrong bin. It's physically in the building but invisible to the person pulling against the BOM.
Receiving errors: A delivery of 100 was counted as 120. The shelf number was wrong from the start.
Damage in handling: Parts broken during restocking, dropped, or ruined by improper storage.
These are phantom losses. If you're tracking inventory counts in a spreadsheet, ERP, or any count-based system, the numbers say you have 80 on the shelf. You actually have 55. Your reorder point is 60, so the count-based system thinks everything is fine. It's not.
Why This Matters for Every Calculation in This Guide
Every reorder point and buffer in this guide includes a safety stock component. Safety stock is not just padding for "what if we use more than expected." It protects against both:
Consumption variation -- a surge in kit orders, a new customer, a seasonal spike
Unplanned loss -- the phantom losses listed above that silently erode your actual shelf count
This is also why a pull system with visual checks works where count-based inventory systems fail. An MRP, ERP, or spreadsheet trusts the number in its records. If the records say 80, the system plans based on 80. It has no way to know the shelf actually holds 55 unless someone manually counts and corrects it. A Kanban pull system doesn't track counts -- the shelf is the source of truth. When you walk to the shelf and count what's there, you see reality.
Setting Up Kit Components
Each component in a kit gets its own order card and its own slot on the shelf. The kit itself is not a single card. It is a family of independent cards whose reorder points each need to be set correctly.
Organize Shelves by Part Type, Not by Kit
Do not group shelves by kit. In most operations, the same component appears in multiple kits. A MAF sensor might be part of three different control packs. An M6 screw might go into every kit you build. Grouping by kit would mean duplicating shelf locations for shared parts, which creates confusion and double-counts your inventory.
Instead, organize your shelves by whatever method makes sense for your operation. Common approaches:
MethodHow It WorksBest For | ||
By part type | Group by category: electrical, fasteners, hoses, sensors, etc. | Operations where techs think in terms of "I need a screw" not "I need Kit A" |
By size | Group by physical dimensions or bin size | Dense shelving with many small parts |
By supplier | Group by vendor | Operations that receive and restock by supplier delivery |
Random allocation | Assign each part a random shelf location using a generated number or code | See below |
Random Space Allocation
Assigning shelf locations randomly (e.g., using a random number generator to assign bin positions) sounds counterintuitive, but it solves several real problems:
Eliminates bias in shelf placement. When people organize "logically," similar-looking parts end up next to each other. That causes picking errors. A random layout forces the picker to read the label and match the BOM, not grab from muscle memory.
Prevents hot-spot congestion. If all fasteners are in one aisle, every kit builder crowds the same 3 feet of shelf. Random distribution spreads traffic across the storage area.
Simplifies slotting new parts. With a category-based system, adding a new part means finding room in the "right" section, which may be full. With random allocation, any open slot works.
Works when categories don't. If your inventory spans thousands of SKUs across many kit families (like an auto parts operation building kits for 20+ vehicle platforms), clean categories break down. Random allocation with a good BOM is simpler and more scalable.
Random allocation only works if your BOM includes the shelf location for every part. Without the BOM, nobody can find anything. With it, the picker doesn't need to know the layout by heart -- they just follow the list.
The kit BOM (bill of materials) is the layer that maps parts to kits, not the shelf layout.
Setting Reorder Points
Every order card needs a reorder point -- the shelf level at which the card gets scanned to trigger replenishment. The formula is the same for every component:
Reorder Point = (Daily Consumption x Lead Time in Days) + Safety Stock
Where: - Daily Consumption is how many of this part you use per day. If the part appears in multiple kits, sum the consumption across all kits. This is the most common mistake -- setting a reorder point based on one kit's usage when three kits share the part. - Lead Time is the actual number of days from scan to shelf, not the supplier's quoted lead time. Track it over several cycles. Include receiving, inspection, and restocking time. - Safety Stock is typically 2-3 days of consumption. This buffer covers both consumption spikes and unplanned loss (see "Why Stock Disappears" above). For components with long lead times or high phantom loss rates, increase the buffer.
Example: PM Hardware Kit (5 kits/day)
Component | Qty per Kit | Daily Use | Lead Time | Safety Stock (3 days) | Reorder Point |
Screws (M6x20) | 4 | 20/day | 3 days | 60 | 120 |
Gaskets (25mm) | 2 | 10/day | 5 days | 30 | 80 |
Housings (AL-4) | 1 | 5/day | 10 days | 15 | 65 |
Filters (F-12) | 1 | 5/day | 3 days | 15 | 30 |
Important
The housing has a 10-day lead time. If you set its reorder point based only on its own consumption (5/day x 10 days = 50), you've ignored the safety buffer. At 65 units, you have 3 extra days of coverage. That buffer protects against both a consumption spike and any phantom loss that silently reduces your actual count.
Shared Components
For parts used across multiple kits, sum consumption across all kits before calculating the reorder point:
Total Daily Use = Sum of (Kits per Day x Qty per Kit) across all kits
For example, if an M6 screw appears in three different kits:
Kit | Kits/Day | Qty per Kit | Daily Use from This Kit |
PM Hardware Kit | 5 | 4 | 20 |
Coyote Control Pack | 2 | 6 | 12 |
Service Kit B | 3 | 2 | 6 |
Total | 38/day |
The reorder point and order quantity for that screw must be based on 38/day, not on any single kit's consumption. If you set it based on only one kit, you will consistently stock out.
Right-Sizing Order Quantities
Each component reorders independently -- the Kanban card handles that. But the order quantity needs to be large enough that the part lasts through its replenishment window. The order quantity should cover consumption from the time the order is placed until the delivery arrives and the next reorder can be triggered:
Order Quantity = Daily Use x Lead Time + Safety Stock
Components with different lead times and consumption rates will reorder at different frequencies. A screw order might bring in a 2-week supply while a housing order only covers 3 days. That's not wrong -- it's just how different lead times and consumption rates work in a pull system. Each component runs its own cycle. The problem only arises if an order quantity is too small to last through the lead time.
Setup Steps
Create an order card for each component. Every part in the kit gets its own card with its own reorder point and order quantity. The card lives at its shelf location.
Build a kit BOM. A simple document (printed sheet, Coda table, or spreadsheet) that lists every component, quantity per kit, and its shelf location. Sort the BOM by pick order -- the physical sequence a picker would walk through the shelves -- so they move through the aisles in one pass without backtracking. This is the single source of truth for what goes into each kit.
Print and place order cards. Attach each card at its bin. When a component hits the reorder point, the card gets scanned or dropped.
Post the kit BOM at the assembly area. The person building kits uses the BOM to pull from the right shelf locations. They don't need to know which other kits use the same parts.
Account for shared components. If a part appears in multiple kits, its reorder point and order quantity must reflect total consumption across all kits, not just one.
Tip
The kit BOM is your most important tool. Keep it current. When a kit design changes (a part is added, removed, or substituted), update the BOM immediately. Stale BOMs cause missed parts and wrong reorder points.
Note
**Mizusumashi (Water Spider)**: In Toyota's production system, a dedicated material handler called a mizusumashi runs fixed-route, timed loops through the inventory area -- delivering parts to the line, picking up empty Kanban cards, and returning them to trigger replenishment. If your operation has enough volume, assigning someone to a regular picking route (even just twice a day) catches empty bins earlier and keeps reorder signals flowing. The BOM pick order becomes their route sheet.
Kitting When Everything Is in Stock
This is the happy path. All components are in stock.
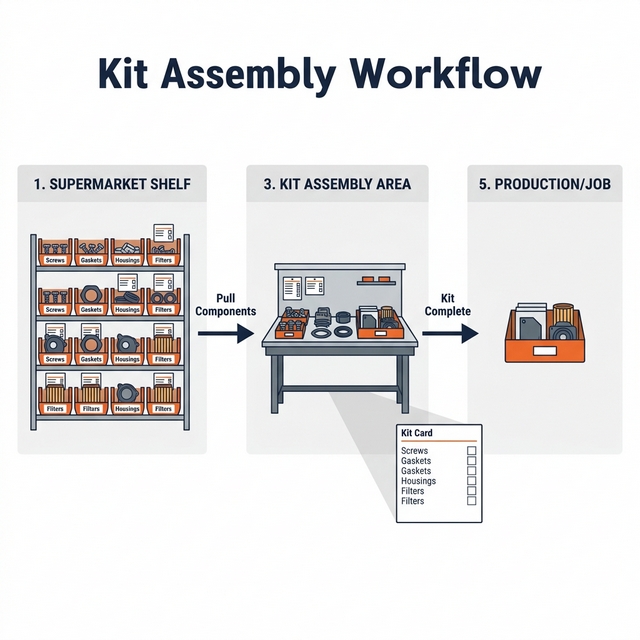
Kit assembly workflow: pull components from inventory shelves, assemble at the kit area, deliver to production
Steps
Check the kit BOM. Confirm which components and quantities are needed. For example, a Coyote Control Pack BOM might list: PCM, wiring harness, throttle pedal, MAF sensor, air box, upper and lower radiator hoses, and 2 HEGO sensors.
Pull from the shelves. Follow the BOM in pick order. Walk through the aisles and pull each component. Check off the BOM as you go.
Watch reorder points. If pulling a component brings the shelf below the minimum quantity, scan the order card or drop it in the drop bin. This triggers the Kanban reorder loop. For example, if you pull the last 4 HEGO sensors for 2 control packs and the reorder point is 6, scan the card now -- don't wait until the bin is empty.
Assemble the kit. Group the components at the kit assembly area. Verify against the BOM -- count matters. A kit with 3 screws instead of 4 is a defective kit.
Deliver to production or packaging. The kit is ready for the job or the customer.
Note
Heijunka (Production Leveling): Toyota prevents kit synchronization problems upstream by leveling production. Instead of building 10 of Kit A on Monday and 10 of Kit B on Tuesday, they alternate: A-B-A-B throughout the day. This keeps every component depleting at a steady rate. If your operation builds multiple kit types, spreading them across the day (rather than batching all of one type) smooths consumption and reduces the chance of one kit draining all the shared components at once.
Handling a Component Stockout
A stockout during kitting means one or more components are not available on the shelf. A stockout is a signal that something in the system needs attention. Stop what you're doing and fix it now, because the cost of ignoring it is a bigger stockout later.
The cause could be planned consumption (you used more than expected) or unplanned loss (a phantom loss reduced your actual stock below the reorder point without anyone noticing). The response is the same either way.
Stockout response flow: scan the order card, stop and audit planned consumption across the full BOM, decide what to do, adjust min quantities to prevent repeats
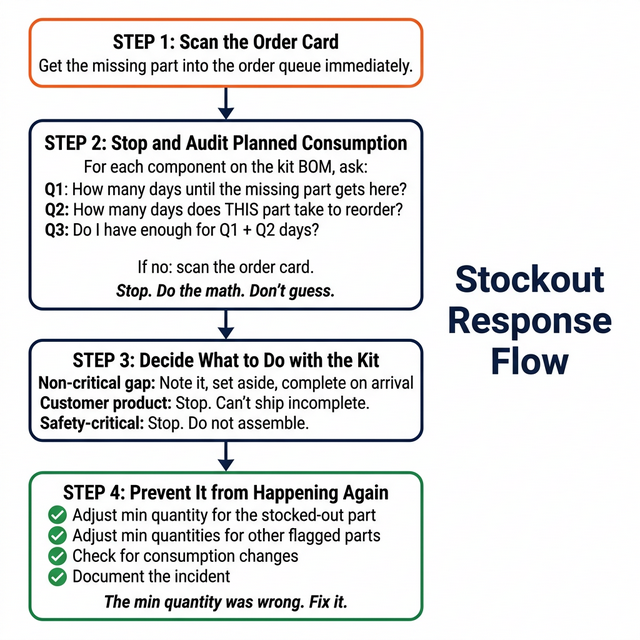
Step 1: Scan the Order Card Immediately
As soon as you find an empty bin, scan the order card (or drop it in the drop bin) to get the missing component into the order queue. This happens first, before anything else. If your operation has an expedite procedure for stockouts, follow it now -- the standard reorder lead time may not be fast enough.
Example: You're pulling parts for a Coyote Control Pack and the MAF sensor bin is empty. Scan the MAF sensor order card right now. Don't finish picking the rest of the kit first. The reorder clock starts ticking the moment you scan.
Step 2: Stop and Audit Planned Consumption
Do not skip this step. A stockout in one component is a leading indicator that other components in the same kit may be drawing down. Before you decide what to do with the kit, stop and check everything.
Why stop now? The cost of finding one stockout and moving on is a second stockout next week that you could have prevented today. The audit might take up to an hour for a large BOM. A cascading stockout costs you a day or more. You're not just checking stock levels -- you're verifying that the system is working, that reorder points are set correctly, and that the shelf matches what consumption math says it should. Every stockout is a free diagnostic.
Note
**Andon (Stop and Fix)**: In Toyota's production system, any worker can stop the line the moment they detect a defect. The principle is that fixing a problem at the source is always cheaper than letting it move downstream. The same logic applies here: a stockout is a defect in your inventory system. Stopping to audit the full BOM now prevents a bigger, more expensive disruption later. The pressure to keep building kits is real, but the time you spend on the audit saves the hours you'd lose to a second stockout you didn't see coming.
Pull out the kit BOM. For each component on the list, go to its shelf location and ask three questions:
The Three-Question Check
Q1: How many days until the missing part gets here? This is the lead time of the part that stocked out. If it's already been ordered (Step 1), check the expected delivery date. If the order card was just scanned, use the standard lead time.
Q2: How many days does THIS part take to reorder? This is the lead time of the component you're currently looking at. Check the order card or your records.
Q3: Do I have enough on the shelf to last that many days? Add the answers to Q1 and Q2 together. Multiply by how many of this part you use per day (across all kits). That's how many you need on the shelf right now. Count what's physically there. If you have less than that number, scan the order card.
Why both Q1 and Q2? You need enough stock to ride out the wait for the missing part (Q1). But you also need enough so that when the missing part arrives and kitting resumes at full speed, this component doesn't immediately stock out while waiting for its own reorder to arrive (Q2).
Why count the shelf? Because the actual count may be lower than you expect. Unplanned losses -- defects, shrinkage, misplaced parts, receiving errors -- silently reduce stock without triggering a reorder signal. The physical count catches these phantom losses. This is a core advantage of Kanban: the shelf is the source of truth, not a number in a spreadsheet or ERP.
Repeat the three-question check for every component on the BOM. Then check other kits that share the missing part -- pull their BOMs and run the same check.
Place all reorders at once.
Example: You stock out on M6 screws. Screws have a 5-day lead time.
You go to the gaskets shelf. Gaskets have a 3-day lead time. You use 10/day across all kits.
Question | Answer |
Q1: How many days until screws arrive? | 5 days |
Q2: How many days to reorder gaskets? | 3 days |
Total days to cover | 8 days |
Daily use | 10/day |
Stock needed | 80 |
Stock on shelf | 50 |
Action | Scan the card. 50 is not enough for 8 days. |
Next you check housings. Housings have a 10-day lead time. You use 5/day.
Question | Answer |
Q1: How many days until screws arrive? | 5 days |
Q2: How many days to reorder housings? | 10 days |
Total days to cover | 15 days |
Daily use | 5/day |
Stock needed | 75 |
Stock on shelf | 90 |
Action | No action. 90 covers 15 days. |
Step 3: Decide What to Do with the Kit
Now that you've scanned the order card and audited the full BOM, decide how to handle the affected kit. This is a judgment call based on the specific situation, not a blanket rule.
Situation | Action |
The kit is for an internal job and the missing part is non-critical (e.g., a label, a secondary fastener) | Note the gap, set the kit aside with a clear tag of what's missing. Complete it when the part arrives. |
The kit is a customer product that ships as a unit (e.g., a control pack) | Stop building that kit. You can't ship it incomplete. Move to a different kit or product that doesn't need the missing part. |
The missing part is a safety-critical component | Stop. Do not assemble or deliver the kit without it. Flag it clearly. |
Multiple components are missing and the kit would be mostly empty | Stop building this kit. Focus on kits that can be completed. |
Only one low-cost, non-critical item is missing and you have 50 kits to build today | Note the gap, keep assembling, complete on arrival. But scan the card and audit the BOM first. |
The key principle: the audit comes before the decision, not after. Don't decide to keep going and then forget to check the rest of the BOM. The reorder and audit happen immediately. The decision about whether to continue, pause, or stop is secondary.
Important
A stockout is information. It tells you the system needs adjustment. If you react only to the missing part and ignore the rest of the kit, you'll get another surprise next week. The BOM audit is what turns a single stockout into a system-wide health check.
Step 4: Prevent It from Happening Again
After the immediate response (Steps 1-3), take these follow-up steps. The stockout happened because the min quantity was wrong -- either consumption changed, or unplanned loss eroded your actual stock below the safety buffer. Either way, fix it now.
Verify all reorders are placed. Go back through every card you scanned in Step 2. Confirm they're in the order queue. Check expected delivery dates.
Adjust the min quantity for the stocked-out part. The current reorder point failed. Recalculate it using:
Reorder Point = (Daily Consumption x Lead Time in Days) + Safety Stock. Make sure "Daily Consumption" reflects total consumption across all kits, not just one.Review whether other components also need min quantity adjustments. If the BOM audit in Step 2 revealed other items that wouldn't survive the replenishment window, adjust those reorder points too. Do it now while the data is fresh.
Determine the root cause. Was this a consumption change (more jobs, new customer, seasonal spike)? Or is unplanned loss eating into your safety stock? Compare the shelf count you found during the audit to what the math says should be there based on consumption alone. If the numbers don't add up -- you should have had 80 but only found 55 -- the gap is phantom loss (defects, shrinkage, parts borrowed without scanning, receiving errors). That means your safety stock is being consumed by losses instead of doing its job as a buffer. The fix is different for each: consumption changes mean raising the reorder point; phantom losses mean finding and stopping the source of the loss.
Check for shared component impact. If the stocked-out part is used in multiple kits, recalculate its reorder point using total consumption across all kits. This is the most common miss.
Document the incident. Record what stocked out, when, the root cause (consumption change or unplanned loss), and what you changed. This becomes your data for spotting systemic problems.
Example: HEGO sensors stock out. You trace it back: you added the Bronco Swap Kit to your product line last month, which also uses HEGO sensors. The reorder point was set for 2 kits/week (4 sensors), but now you're building 4 kits/week (8 sensors). Lead time is 5 days. Old min: 4/day x 5 days + 12 safety = 32. New min: 8/day x 5 days + 24 safety = 64. You doubled production but the min quantity never changed. Fix it.
Tip
If the same component stocks out twice in 90 days, the min quantity is wrong. Raise it by at least 20% or one extra lead-time buffer. Don't wait for a third stockout.
Keeping Kit Components in Sync
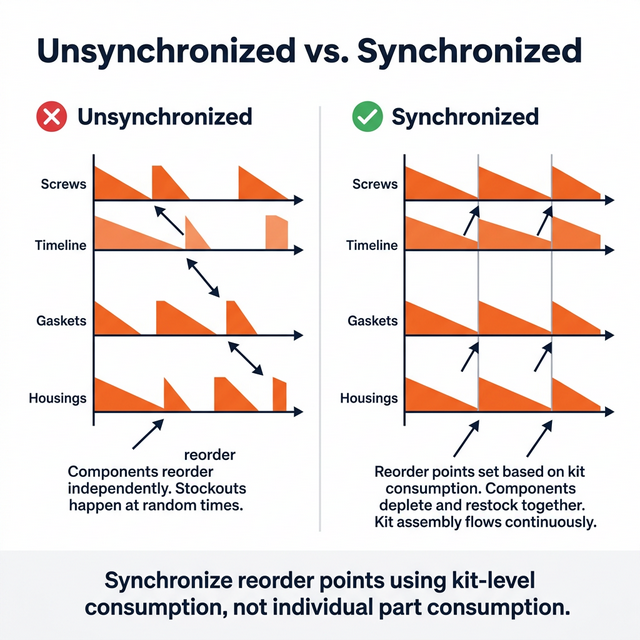
The hardest problem in kitting is cycle drift: components with different lead times and consumption rates fall out of sync. Component A restocks on Monday, Component B restocks on Thursday, and by the time Component C arrives the following week, you've already consumed all of A again.
Cycle drift gets worse when unplanned losses are present. If parts are silently disappearing (defects, shrinkage, borrowing), the actual shelf counts drift away from what the reorder math expects, and the timing of reorder signals shifts unpredictably.
Before and after: unsynchronized vs. synchronized reorder points for kit components
Lead-Time Alignment
The goal is not to get all components arriving at the same time. The goal is to make sure no component stocks out while you're waiting on another one. In a pull system, each component reorders independently when its card gets scanned. The components don't need to be synchronized -- they just each need enough stock to last through their own replenishment window.
The problem happens when reorder points are set in isolation. A screw with a 3-day lead time and a housing with a 10-day lead time both get scanned on the same day. The screws arrive in 3 days, but the housing takes 10. If you resume full-speed kitting when the screws land, you might burn through screws again before the housing arrives. The Three-Question Check (Step 2) catches this in the moment. Lead-time alignment prevents it from happening in the first place.
Steps
Map every component's actual lead time. Not the quoted lead time -- the real one. Track the number of days from scan to shelf over several cycles and use the average. Include receiving, inspection, and restocking time.
Set each component's reorder point to account for the longest lead time in the kit, not just its own. If the slowest component in the kit takes 10 days and this component takes 3, the 3-day component's reorder point still needs enough safety stock to cover consumption during the 10-day window. This is the same logic as the Three-Question Check, but built into the reorder point so it's automatic.
Buffer components with long lead times. When one component has a significantly longer lead time than the rest, set higher safety stock on it. A longer lead time means more exposure to both consumption variation and unplanned loss.
Plan for split shipments. Do not assume a single PO means a single delivery. Suppliers routinely ship items as they become available. Track each line item on the PO independently and treat each as its own delivery event.
Set up per-item receiving. When a partial shipment arrives, receive and restock only what showed up. Update the order status for those items. The remaining items on the PO stay in the order queue until they arrive.
Note
**Heijunka (Production Leveling)**: All of the math above assumes steady consumption. If you batch production -- all of Kit A on Monday, all of Kit B on Tuesday -- consumption spikes on shared components and your safety stock calculations break down. Leveling production (alternating A-B-A-B throughout the day) smooths consumption across components and makes reorder points far more reliable. See the Heijunka note in "Kitting When Everything Is in Stock" above.
Common Issues
Problem | Likely Cause | Fix |
One component stocks out repeatedly | Min quantity too low for actual consumption or unplanned loss | Raise min quantity using the formula above. Check if consumption has increased or if phantom losses are eroding stock. |
Team ignores stockouts and keeps building without scanning | No stockout response process, or the process is too many steps | Post the 4-step stockout response at the assembly area. Step 1 (scan the card) must become muscle memory. |
Reordering one component but missing others that are also low | No planned consumption check when a stockout occurs | When one component stocks out, run the Three-Question Check on every other component. Don't guess -- do the math. |
Components arrive at different times, causing repeated partial stockouts | Reorder points set in isolation without accounting for the kit's longest lead time | Set safety stock on each component to cover consumption during the slowest component's lead time. |
Min quantity never gets updated after a stockout | No follow-through on Step 4 | After every stockout, recalculate the min quantity for the stocked-out part and any other parts flagged during the audit. Make this a required step. |
Reorder gets triggered too late | Min quantity doesn't account for kit-level consumption | Recalculate min quantities using total daily consumption across all kits, not just one. |
Same stockout keeps happening after a new kit or customer is added | Min quantity wasn't recalculated for the new demand | Recalculate total consumption across all kits that use that component. Update the min quantity to reflect the new total. |
Shared component stocks out even though individual kits seem fine | Min quantity set based on one kit's consumption, not total consumption across all kits | Sum daily use across every kit that uses the part. Set min quantity on the total. |
Shelf count doesn't match what you expect when you check | Unplanned loss: defects, shrinkage, misplaced parts, receiving errors | Investigate the source. Check receiving accuracy, storage practices, and whether parts are being borrowed without scanning. Increase safety stock buffer until the root cause is fixed. |
Stockout happens even though the reorder point should have covered it | Actual stock was lower than expected due to phantom loss. The reorder point math was right, but the starting count was wrong. | Increase safety stock to absorb a higher rate of unplanned loss. Investigate and fix the upstream process causing the loss. |